This set of Deliverables is due at the beginning of class on Wednesday, February 24 (REVISED DUE DATE). It has the following parts:
- Five Small Technical Exercises
- Readings + Response: Color
- Generative Pattern (Wallpaper)
![]()
1. Five Small Technical Exercises
The purpose of the following 5 exercises is to ensure that you have mastered certain technical skills, and that you are familiar with specific commands and/or code structures. Kindly follow the instructions as carefully as possible. Time will be reserved during class work-sessions to work on this.
- Create one single blog post to collectively document all of the exercises in this section.
- Title this blog post, Nickname-Exercises03.
- Categorize this blog post, 03-Exercises.
- There are 5 small exercises:
- Iteration: Seven Circles
- Variables: A Parametric Triangle
- Transformations + Functions: Critter
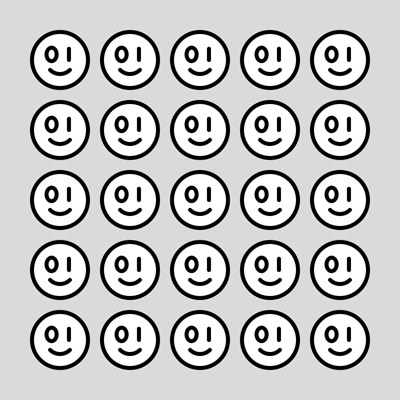
1A. Iteration: Seven Circles
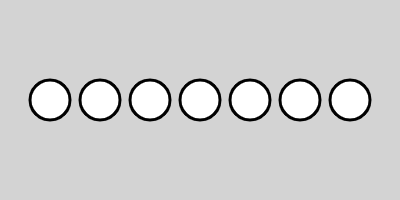
The purpose of this exercise is to ensure that you are familiar with basic iteration. In a sketch at editor.p5js.org, reproduce the figure above, as follows:
- The canvas has dimensions of 400 x 200 pixels, and is filled with a “lightgray” background.
- All figures are drawn with a black, 3-pixel-thick stroke and a white fill.
- There are seven circles, which are each 40 pixels in diameter. They should be rendered iteratively, using a structure such as a for loop. You can find out more about for loops in this reference; this tutorial; and this Coding Train video (14m).
- If you are already familiar with for loops, then use a while or do/while loop, as discussed in this tutorial or this Coding Train video.
- The centers of the circles are positioned (vertically) at half the height of the canvas. This should always remain true, even if the dimensions of the canvas are changed.
- The centers of the circles are spaced (horizontally) every 50 pixels, starting at 50 pixels across. There should not be any circle overlapping the edge of the canvas.
- In your blog post, embed a screen capture of your sketch, and embed a link to your Editor code.
1B. Variables: A Parametric Triangle
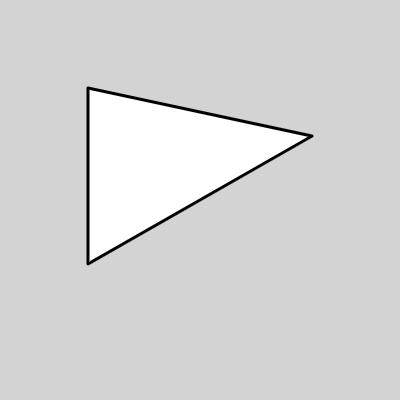
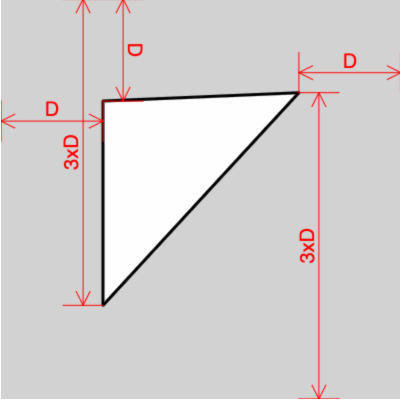
The purpose of this exercise is to ensure that you are familiar with declaring a variable, and how to use it to create a simple parametric form (e.g., a triangle articulated by a single variable). In a sketch at editor.p5js.org, reproduce the figure in the above left, as follows:
- The canvas has dimensions of 400 x 400 pixels, and is filled with a “lightgray” background.
- A triangle is drawn with a black, 3-pixel-thick stroke, a white fill, and rounded corners.
- You are not asked to draw the red elements; they are a “debug view” to help you understand the problem.
- Declare a variable called D, and assign it the value of a random number between 75 and 125. This variable D should be the only user-defined variable in your program. If you would like to learn more about variables, see the following: Example; Coding Train video (12m); Tutorial 1, Tutorial 2.
- The vertices of the triangle should be located according to the red elements in the diagram above, which shows their relationships. (Note: the left edge of the triangle is purely vertical.). Your triangle should retain these relationships to the edges of he canvas, even if the dimensions of the canvas were modified.
- In your blog post, embed a screen capture image of your sketch, and embed a link to your Editor code.
1C. Transformations + Functions: Critter
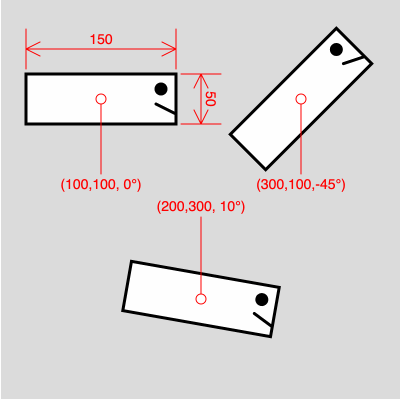
The purpose of this exercise is to ensure that you are familiar with creating your own functions, and to give you more practice using graphic transformations. In a sketch at editor.p5js.org, reproduce the figure above, as follows:
- At the p5.js Editor, create a sketch whose dimensions are 400 x 400 pixels.
- In your sketch, create a function called drawCreature. It should render a simple creature consisting of a 150 x 50 pixel rectangle, with an eye and mouth at one end. (These eye and mouth features will help ensure that the creature is facing in the correct direction). I’m using a 3-pixel thick black line, and a white fill, but you don’t have to.
- You may find it helpful to use the rectMode(CENTER) command, though you are not required to do so. Here’s the rectMode() reference; and here’s a 2-minute demo video.
- Modify your function so that it takes three arguments, respectively: the (x,y) pixel location of the center of the creature, and a rotation angle (in radians), which will govern the amount that the creature is rotated about its center point.
- Call your function so that it draws three copies of the creature, at the locations shown in the red overlays above. The draw() function of your sketch should look exactly like the code shown below: nothing less, and nothing more. (You are not expected to draw the red overlay; that’s a “debug view” to clarify the task.)
function setup(){ createCanvas(400, 400); } function draw() { background (220); drawCreature (100, 100, radians(0)); drawCreature (300, 100, radians(-45)); drawCreature (200, 300, radians(10)); } function drawCreature ( ? ? ? ? ? ? ... - In your blog post, embed a screen capture image of your sketch, and embed a link to your Editor code.
1D. Nested Iteration With Functions: Repeated Motif
The purpose of this exercise is to ensure that you are familiar with nested iteration, and to give you more practice creating your own functions.
- At the p5.js Editor, create a sketch whose dimensions are 400 x 400 pixels.
- Write a function that encapsulates the code to render a simple visual motif, such as a leaf, face, car, strawberry, etc. You may use any colors and shapes you please; you do not need to copy the face motif shown here. (For more information on creating your own functions, you may refer to Coding Train video 1 (12m), Coding Train video 2 (10m), this Example, or this Tutorial.)
- Give your function arguments that determine where the element will be positioned when the function is invoked. Using iteration, call your function to display a grid of these elements.
- In your blog post, embed a screen capture image of your sketch, and embed a link to your Editor code.
1E. Nested Iteration + Randomness Gradient: Recoding Schotter (1968)
The purpose of this integrative assignment is to combine problems in nested iteration and graphical transformations, and introduce experience developing a gradient.
Perhaps you are wondering why artists copy paintings in museums, as I am doing. The answer is to study, to learn, and to find inspiration from the great masters of the past. Copying directly from works of art gives the artists insight into the creative process — insights which cannot be learned from any other source. —Gerald King
In February 1965, Georg Nees (1926–2016) became the first person to ever exhibit artwork created with a computer. His programs were written on punched paper tape before being physically generated by a drawing machine, the Zuse Graphomat Z64. (His exhibit “aroused much controversy.”)
In this exercise, we will hone our skills by copying a masterwork. You are are asked to recreate Nees’ artwork Schotter (“Gravel”, 1968), in the collection of the Victoria & Albert Museum, London. In this work, Nees presents a grid of 12 by 22 squares which delineate a gradient from order to disorder. As the drawing of the squares progresses from top to bottom, the position and rotation of the squares become increasingly disordered.

- At the p5.js Editor, create a sketch whose dimensions are 680 x 1000.
- To the best of your abilities, write a program which recreates the logic and aesthetics of Schotter. Pay attention to details like the number and size of squares, their amount of displacement, and the proportions of the margins. (Note: you are not expected to reproduce the specific positions and rotations of each square in Nees’ artwork).
- In your blog post, embed a screen capture image of your sketch, and embed a link to your Editor code.
![]()
2. Readings & Response: Color
Please read the following two brief articles about color in generative art:
- Tyler Hobbs, Color in Generative Art
- Rune Madsen, Color Models and Color Spaces
Now:
- Create a blog post entitled Nickname-Readings03, and categorized 03-Readings
- In 50-100 words, briefly discuss one thing which struck you as helpful new information.
![]()
3. Generative Pattern (Wallpaper)
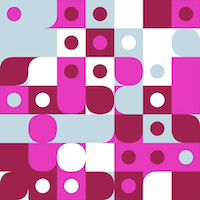
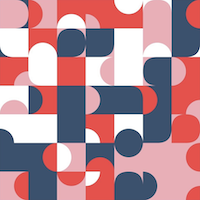
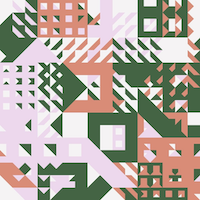
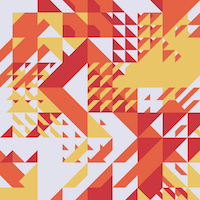
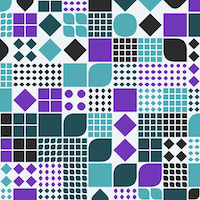
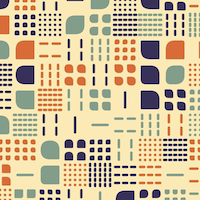

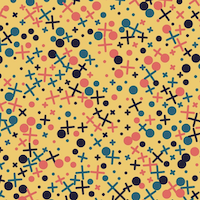
Images by Saskia Freeke.
Pattern is the starting point from which we perceive and impose order in the world. Examples of functional, decorative, and expressive pattern-making date from ancient times and take the form of mosaics, calendars, tapestry, quilting, jewelry, calligraphy, furniture, and architecture. There is an intimate connection between pattern design, visual rhythm, geometry, mathematics, and iterative algorithms. This assignment invites you to hone your understanding of these relationships in formal terms.
Write code to generate “infinite” variations of a tiling pattern or repetitive textural composition, as for wallpaper or fabric. Your pattern should be designed so that it could be infinitely tiled or extended. Design something you would like to put on the walls or floor of your home, or that you could imagine yourself wearing. Export your pattern in a high-resolution format with provided code.
Suggestions
Give consideration to:
- Symmetry, whether achieved through reflection or rotation. Experiment with 2D graphics transformations, such as rotation, scaling, and mirror reflections
- Rhythm. Try using nested iteration to develop 2D patterns or other gridlike structures
- Positive vs. negative space
- Foreground, middle-ground, and background “layers”
- Detail at multiple scales, i.e., variation at the macro-scale, meso-scale, and micro-scale
- The potential for surprise through the placement of infrequent features
- Give attention to color: feel free to use a palette creator, or a different palette creator, or a palette extraction tool or surf through here until you find a color scheme you like
- Precise control of organic and/or geometric shapes. Create a helper function to abstract the way
in which a complex visual element (such as a flower, animal, fruit, or fleur-de-lis) is rendered throughout your design. - Randomness. Give consideration to the depth of variation in your pattern, and how impactfully randomness shapes the design. After how many viewings does your pattern become predictable? How might you forestall this as long as possible? At least 5 different parameters must be subject to variation.
Submission Details
Now:
- Check out these inspirations.
- Sketch first on paper.
- Create your pattern at the P5 Editor.
- Export 2 high-resolution images (4000-5000 pixels wide) using the code (see below).
- Create a blog post, entitled Nickname-Wallpaper and categorized 03-Wallpaper
- Write 100-200 words narrating your development process.
- Embed images of your project that link to the high-resolution results. Be patient uploading big images to WordPress.
- Also include some scans or photos of your paper sketches.
Helpful Code Template
The template code below exports a high-resolution version of your project when you press the ‘e’ key. There are a couple things to note about this code:
- Most of the code you shouldn’t touch. Your code to design your pattern should go in drawMyDesign(). Don’t touch the draw() function.
- Inside drawMyDesign(), put myScaledCanvas. just before any drawing commands, such as: myScaledCanvas.fill(“red”);. This will allow you to add graphics to the high-resolution output image.
// Exports a high-resolution image when 'e' key is pressed.

let outputScale = 5;
let currentScale;
let myScaledCanvas;
let canvas;

//=================================================================
function setup() { // setup
  canvas = createCanvas(800, 800);
  myScaledCanvas = createGraphics(800, 800);
  currentScale = 1; // initialize to 1; don't touch
}

function draw() {
  // Don't touch the contents of the draw loop!
  // Instead, modify the guts of the drawMyDesign() function.
  myScaledCanvas.clear();
  myScaledCanvas.push();
  myScaledCanvas.scale(currentScale);
  drawMyDesign();
  myScaledCanvas.pop();
  image(myScaledCanvas, 0, 0); // Show on the main canvas
  noLoop();
}

// Scale up graphics before exporting
function exportHighResolution() {
  currentScale = outputScale; // High-Res Export
  myScaledCanvas = createGraphics(currentScale * 800, currentScale * 800);
  draw();
  save(myScaledCanvas, "highResImage", 'png');
  currentScale = 1; // Reset to default scale 1:1
  myScaledCanvas = createGraphics(800, 800);
  draw();
}

function keyReleased() { if (key == 'e') exportHighResolution(); }
function mousePressed() { loop(); }

//=================================================================
function drawMyDesign() {
  // Draw your design in this function -- into the scaled canvas.
  // Notice how all drawing functions begin with "myScaledCanvas."

  myScaledCanvas.background("pink");
  for (var i = 0; i < 20; i++) {
    var px = random(0, width);
    var py = random(0, height);
    myScaledCanvas.circle(px, py, width * 0.15);
  }
}